Unleashing Creativity with Black Pen Sketching

Sketching is like creating a magical map of your imagination on paper. It’s a super fun way of drawing where you use simple lines and shapes to bring your ideas to life. Think of it as telling a story, but instead of using words, you use lines. With a pencil or pen, you can sketch anything you imagine. It’s your special way of sharing the adventures happening inside your mind to the paper!
The benefits of sketching with black pen
1. Feel Super Brave: Build Confidence in Your Art
Using a black pen makes you feel like an art superhero! Every line you draw stays forever, so you can be super confident in your drawings. It’s like having a special tool that says, “I can do this!” With each stroke, you become more sure of yourself, turning your cool ideas into awesome art.
2. Draw Whatever You Like: Be a Creative Explorer
The black pen is like a magic wand that lets you explore and be as creative as you want. Unlike pencils that you can erase, the black pen encourages you to try new things and have fun with your drawings. You can make lines that are soft and gentle or lines that shout out loud! It’s like going on a creative adventure where your imagination gets to be the boss.
3. So Easy and Fun: Just You and Your Pen!
Drawing with a black pen is super easy and tons of fun. All you need is your imagination and a pen – that’s it! No need for lots of art supplies. Just grab your pen, let your creativity flow, and watch your drawings come to life. It’s like having a pocket-sized art studio ready to go wherever you are
4. Concentration Booster: Focus on Your Art Adventure
Sketching with a black pen is like a secret spell for boosting concentration. When you draw, you dive into a world of creativity where everything else fades away. It’s a super cool way to sharpen your focus, helping you pay attention to every detail of your awesome creations.
5. Improving Fine Motor Skills: Precision with Every Stroke
Sketching with a black pen is not just about drawing; it’s a fantastic workout for your hands, enhancing your fine motor skills. As you guide the pen with precision, you’re training your fingers to become experts at controlling those tiny details. This helps you create artwork that’s not just cool but showcases your mastery of fine motor skills. So, with every stroke, you’re not just drawing – you’re becoming a skillful artist, refining your abilities with every delicate movement!
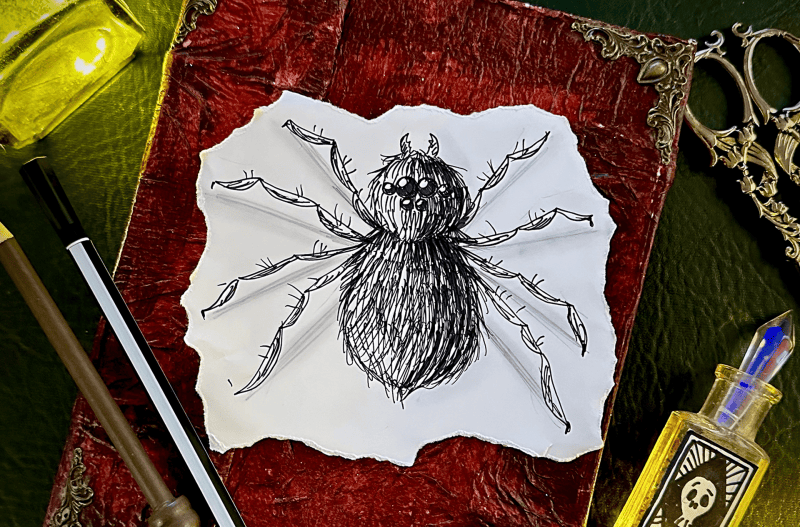
Now let’s practice! How to draw a Spider in black pen sketching
Step 1: Sketching the spider’s with pencil
The first step in sketching can be done with a pencil. This initial sketch helps us “map out” our drawing, allowing us to visualize where the head, body, and legs of the spider will be. Begin by drawing two circles, forming an “8” shape for the body. After sketching the body, add the legs – a spider has eight legs, four on each side. Don’t worry too much about the shape for now; simply draw four long lines on each side. Pay attention to the direction of each leg. To add extra spookiness, draw two fangs on the top of the head (creating the mouth shape). Include the spider’s eyes: two large ones in the center of the head, another two eyes on each side of the large eyes, and an additional two on top! Yes, lots of eyes for extra creepiness!
Step 2: Start sketching with the black pen
Now the fun begins! Start by emphasizing the body lines with delicate strokes. You can create little gaps in the lines to avoid making it look overly “fine.” Next, “break” the legs into three lines each, shaping each part like little boats. When it comes to the eyes, fill them with black color, but try to leave a small white spot in each for that extra touch of shine.
Step 3: Sketching the spider’s hair
Start by drawing small lines in a row from the top of the spider’s head. As you move down each line, draw lines from end to end (right to left) until you reach the bottom of the spider’s body. Once you complete this, start over. This time, draw denser lines; they don’t have to connect end to end but should span from the side to the middle of the spider’s body. Add a third and final layer: start again from the top and add another layer of denser lines. In this layer, the rows should be shorter than the second layer. This method creates three layers: the first layer goes from end to end, the second is denser and extends up to the middle, and the third is the densest, covering a quarter of the body. This technique plays with light and shadow, resulting in the right part of the spider’s body appearing darker than the left part.
Step 4: Add some Furry
To create a fur-like texture, include small lines extending beyond the spider’s body boundaries. You can also incorporate small hairs on the legs.
Step 5: Add shadow
Now, let’s draw the shadow that the spider casts on the floor (or on the page). Use a pencil to draw a straight line from the end of each leg to the body. Avoid drawing these lines too strongly. Next, take your finger (yes, your finger) and gently blur the pencil lines. This method is a neat trick to make the lines seem to spread like a blurred shadow.
In conclusion,
keep in mind that drawing with a black pen should be enjoyable and intuitive. The more you practice drawing lines of varying thicknesses and shapes, the more skilled you’ll become. Begin with your favorite objects or characters, steering clear of complex and challenging subjects initially. For instance, starting with drawing fruits or vegetables is an excellent beginning, but also sketching a spooky spider is always a good start for every wizard and witch…
Table of Contents
More posts you would like:
- Including a video tutorial
Subscribe for more tutorials and updates:
Would you like to receive more crafting tutorials?
Subscribe for Free to our newsletter and receive monthly updates.
BONUS – Get a FREE magical activity book.


